Let’s understand what Redux is, its usage and how to use it in React application?

This concept is completely different from what you do with react. React’s every component has its internal state where there is no need of an external library.
So, you would ask that then why do I need an external library to manage the state? Don’t you feel like that it’s bringing more confusion?
It can be true to some extent as once; I do have this same question.
However, managing all these React internal states can be cumbersome and all you need to do is pass props to children and vice versa. Here comes where Redux actually shines.
Advantages of using Redux:
- Redux is not specific to React only as it can be used with another frameworks such as Angular or Vue.js.
- One can manage state of application easily by making usage of Redux. We have tried building an application using plain React but using Redux with React is an elevation.
- Having a single state makes your application predictable that allows you to implement login features. In this case the data lies in only one place i.e. the store.
Working of Redux:
It’s vital to remember that Xcode can only run on macOS. Thus, users will need a Mac to create an iOS app with it. This iPad is an exception. The iPad does not support Xcode.
- The Store
- The Actions
- The Reducers
The Actions: The only way to keep your redux store updated is through the actions. The store gets updated via the store.dispatch() function. Let’s go through an example of action in Redux:
type: 'ADD_TASK',
text: "Do some coding at 8pm",
}
// or simply return {
type: ADD_TASK,
task}
“If a user wants to add a new task then (type: ADD_TASK), with a text (task property)”.
Consider the case when we want to add a new task to our Redux store. We can achieve this with the reducer if we use the following logic:
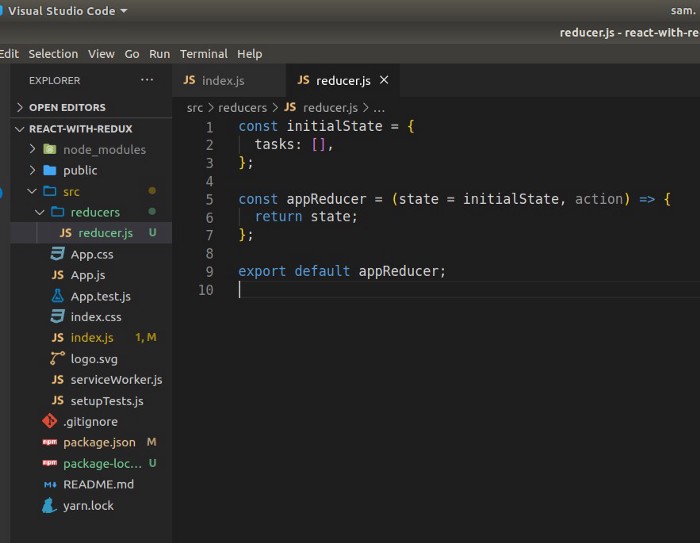
1. We begin by setting up our default store. So we make a new file called reducer.js and add the following code to it:
tasks: [],
}
Now it’s time to define reducer (let’s call it taskReducer)
{switch(action.type){
case 'ADD_TASK':
// do somethingdefault:return store}
Let’s get back to our function. When we receive an action with the type ‘ADD TASK,’ we will now take action. In this scenario, we want to add the task to the store’s tasks array.
{switch(action.type){
case 'ADD_TASK': // adding the task to our storereturn
[...state,
tasks: tasks.concat(action.task)]default:return store}
The return statement causes the state to be updated.
It’s worth noting that before appending the task, we copied the prior state. This is a Redux etiquette. Before you add or remove an element from the previous state, you should copy it.
The programme monitors any changes in your Redux store and automatically updates itself.
Once it recognises a change in the store, any component that is connected to one part or the entire store will re-render. This functionality is useful since it allows you to specify which components can access your state and how they should re-render with the new information.
Now let’s understand how to use Redux with React with the help of an example. We will make this understand to you by implementing it on real app. In this section, we’ll use React to create our first Redux store. Let’s see Redux in action now that we’ve explained how it works.
1. Initiate by creating React Application
First create your React application using simple to-do-list. We are using Vs code but you can stick to your favourite code editor. Now open your terminal and type:
create-react-app react-with-redux
This command creates a react-with-redux folder in which your React application will be stored.
Use your code editor to open that folder. (cd react-with-react-with-react-with-react-with-react-with- We may now go to the next stage, which is Redux installation.
2. Installing Redux in React
Install Redux in your app and then Run the command:
npm install redux
Going forward with the step, now install React-Redux. This installation will allow your react component to have an access on the store.
npm install react-redux
3. Time to create the Store
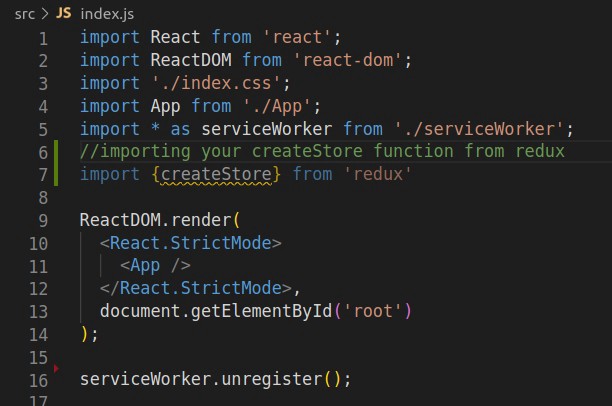
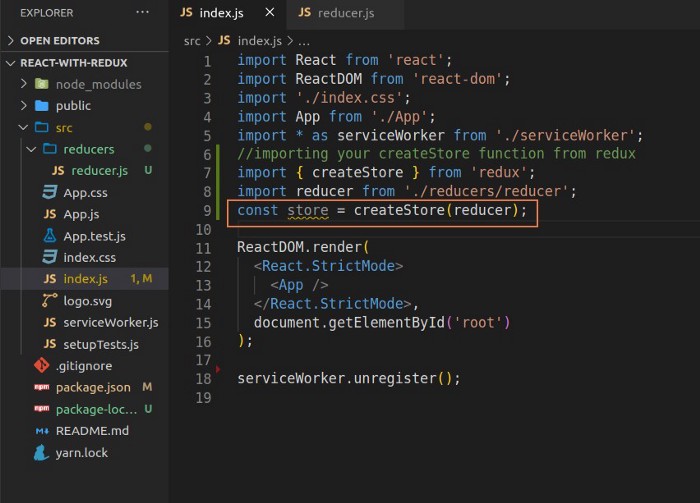
We can now create our store after installing the redux dependencies. This is done in the src folder’s index.js file.
We begin by importing the createStore function from the’redux’ package (line 7 in the screenshot). This function generates the Redux store, which is where the state is stored. Remember that your app should only have one store.

This file will be our application’s reducer:


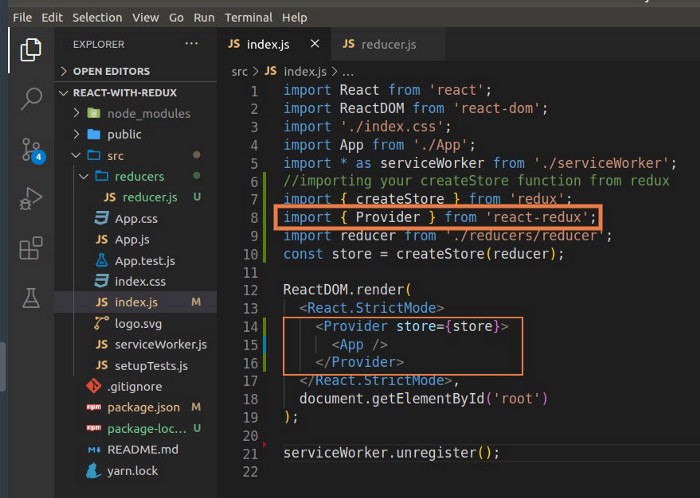
We’ll need to import the Provider component from our react-redux package to do so. We encapsulate it in our App component after that. Any component can access the Redux store, thanks to the Provider:

Hope this blog will be helpful for you!
Recent Posts
Categories
- Design (6)
- Development (26)
- Services (2)
- Technologies (9)
- Technology (4)
- Testing (10)
- Uncategorized (1)


